Selenium is a cross-browser open source automated testing suite. It is similar to the HP’s unified fuctional testing suite but restricted only to the web based applications. This tutorial approaches the selenium from hands-on example based learning. If you’re interested in theory part of the selenium then I suggest reading documentation that comes on the official selenium HQ website. This add-on is useful as a prototyping tool to test some basic interface and to automate workflow for webapps. You should be familiar with the HTML, document object model and java-script.
What is Selenium IDE for Firefox? Selenium IDE is a firefox add-on that allows testers and developers to record their actions as they follow the workflow. Selenium IDE requires following components in order to function :
- Firefox Browser
- Selenium IDE extension
You need to download the IDE add-on from selenium HQ. Go to the download page of the website and find the .xpi file link. Clicking on this link will downlaod the firefox extension. This extension requires restarting of browser.
Check the following Video for Installation of Selenium IDE.
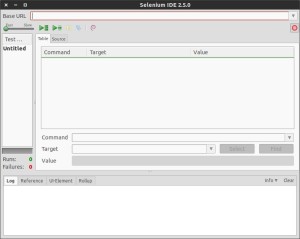
Once installed, navigate to the Tools > Selenium IDE. Click on the menu and IDE should open. Alternatively you can also click on selenium icon in the extreme right side of the browser. You’ll find IDE like the image shown below.

Selenium IDE Add-on
Items of Selenium Add-on IDE
1. Base URL: This is the place where we enter the URL under test.
2. Speed Slider: This slider helps us control the speed of the test. You can turn the test fast and slow using this slider.
3. Buttons: Each button has a specific feature. One buttons runs entire test suite actions, another runs each test step by step. Red button records the action that you take on browser.
4. Command box lists the commands that goes in the test.
5. Target box allows you to focus on the area of the test.
6. Value text box allows you to focus on the value that you want to change.
7. Source tab stores the HTML code of the test suite.
8. Log tab shows the list of test executed and what happened to it during the test and Reference tab shows documentation of the command on the tab.

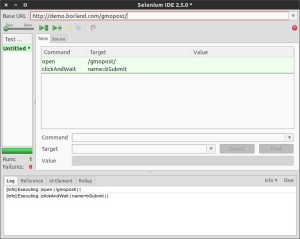
Selenium IDE Add-on Playback
Recording First Test Script
We are going to record our first selenium IDE test. In order to do that, we have to first start firefox browser and then open selenium IDE. Before we start with the workflow under test, we have to make sure that red button of the IDE add-on. To start recording your tests let us do the following:
- While the recording mode is on, navigate to the following address: http://demo.borland.com/gmopost/
- On the Web page do the following: Find the button with title “Enter GMO online”. Click on the button.
- Your short test is completed and it is now saved in test suite.
- You can click on playback again and see if the test plays as per your workflow.
If the test fails then you’ll see errors in red flag in logs tab. You can read the error and then try to correct the workflow again. As there are some of the limitations of the IDE addons, you’re likely to come across some of those errors eventually. If you successfully played back the test then congratulations.
You can also verify the location of your test website played in the browser. Check the video below for how to do that.
